# Docker in Action
# How to control containers
# Creating a new container
docker run --detach --name web nginx:latest
This will download nginx from docker hub hand run the software in detached mode, i.e. no input or output stream.
To run an interactive container:
docker run -i -t --link web:web --name web_test busybox:latest /bin/sh
-i means --interactive. It tells docker to keep the stdin open for the container even if no terminal is attached. -t means --tty. It tells docker to allocate a virtural terminal for the container. This is usually what you want from an interactive CLI. --link web:web means that the container is linked to the web container (the NGINX).
Try to use wget to talk to web.
wget -O - http://web:80
To detach, do ctrl-p + q.
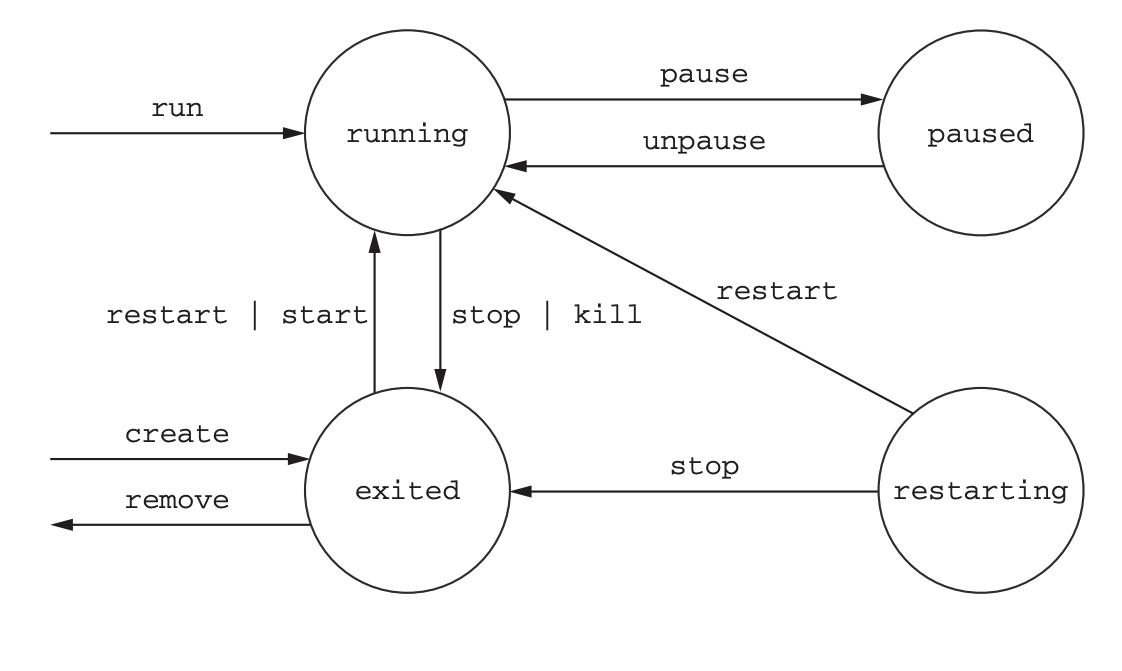
# Listing, stopping, restarting, and viewing outputs
Listing
docker ps
Restart
docker restart <NAME>
Check log. --follow or -f will display the logs and continue updating the display with changes.
docker logs <NAME>
Stop
docker stop <NAME>
Stop all containers. docker ps -q only displays container IDs.
docker stop $(docker ps -q)
Run command in an existing running container.
docker run -d --name nsA busybox:latest /bin/sh -c "sleep  30000"

! run another command "ps"
docker exec nsA ps
The docker process uses namespace or <NAME> to distinguish different containers. So two containers can have the same internal PID because they have different names (namespaces).
You can also try to use the host PID namespace.
docker run --pid host busybox:latest ps
The container name can also be replaced with the long hash ID. Save that to variable.
CID=$(docker create nginx:latest)
echo $CID
# Container state and dependencies
MAILER_CID=$(docker run -d dockerinaction/ch2_mailer)
WEB_CID=$(docker create nginx)

AGENT_CID=$(docker create --link $WEB_CID:insideweb --link $MAILER_CID:insidemailer dockerinaction/ch2_agent)
docker create only create the container but not start it. When starting it, start web first because agent has dependency on it.
docker start $WEB_CID
docker start $AGENT_CID
# Build environment agnostic systems
# Create a read-only file system
docker run -d --name wp --read-only wordpress:4
Inspect container metadata, e.g. check if wp is running:
docker inspect --format "{{.State.Running}}" wp
It's not running because doesn't have a sql database. Run the SQL database with
docker run -d --name wpdb -e MYSQL_ROOT_PASSWORD=ch2demo mysql:5
Then connect to this mysql server.
docker run -d --name wp2 -v /run/lock/apache2/ -v /run/apache2/ -v /tmp/ --link wpdb:mysql -p 80 --read-only wordpress:4
# Environment variable injection
docker run --env MY_ENV_VAR="test env var" busybox:latest env
--env (-e) means specify environment variables. The unix command env prints out current environment variables.
# Keep containers running with supervisord and startup process
supervisord is used to monitor the health condition of processes and restart them if any was killed.
# Cleanup
Show all the containers, including stopped ones.
docker ps -a
Remove a container from computer
docker rm wp
Remove all containers
docker rm -vf $(docker ps -aq)
# Software installation
# Repository
A repository holds a bucket of images with different tags. For example, quay.io/dockerinaction/ch3_hello_registry, quay.io is repository name, dockerinaction is user name, ch3_hello_registry is the short name.
# Docker Hub
There are two ways that an image auther can publish their images on Docker Hub
- Use the commandline to push images that they built independently and on their own system. This is not trustworthy.
- Make a Dockerfile publicly available and use Docker Hub's continuous build system.
# Search for a image
docker search postgres
# Save and load image as a file
docker pull buxybox:latest
docker save -o myfile.tar busybox:latest

docker load -i myfile.tar
# Delete images
Container uses image. So we need to delete the stopped container first.
docker rm <container>

docker rmi <image>
# Installing from a Dockerfile
Dockerfile is a script that describes steps for Docker to take to build a new image.
Listing images
docker images
# Persistent storage and shared state with vlumnes
The image file system is written / mounted to root, while program can write to another volume mounted to the host's fs.
# Example using vlumnes with Cassandra
Create a single volume container.
docker run -d --volume /var/lib/cassandra/data --name cass-shared alpine echo Data Container
This container will immediately stop and we can use it to crate a new volume running Cassandra.
docker run -d --volumes-from cass-shared --name cass1 cassandra:2.2
Then this cassandra container will have a volume mounted at /var/lib/cassandra/data.
Run cassandra client tool and connect it to the running server.
docker run -it --rm --link cass1:cass cassandra:2.2 cqlsh cass
Now you can insert some data, kill this server and create a new one. The data will still be there.
# Volume types
There are two volume types. The types differ in where the location is on the host.
- Bind mount - bind mount volumes use any user-specific directory or file on the host operating system.
docker run --name <name> -v ~/example-docs:/usr/local/...:ro -p 80:80 httpd:latest
The :ro means read-only.
- Managed volume - it uses locations are created by the docker daemon in space controlled by the daemon, called Docker managed space.
docker run -d -v /var/lib/cassandra/data --name ...
To find out the physical location
docker inspect -f "{{json.Volumes}}" cass-shared
You can specify multiple volumes with --volumes-from
docker run --name fowler -v ~/example-books:/library/PoEAA -v /library/DSL alpine:latest

docker run --name knuth -v /library/TAoCP.vol1 alpine:latest

docker run --name reader --volumes-from fowler --volumes-from knuth alpine:latest ls -l /library/
# Deleting volumes
docker rm -v